
Before you can upload a file with time clock punches, tips/sales receipts, piecework items, or miscellaneous adjustments, you must create a template that specifies how the time clock import file is structured, what data is in each column, and how the dates and times are formatted.
For example, for this time clock import file:
Time Clock Import FileTime Clock Import File
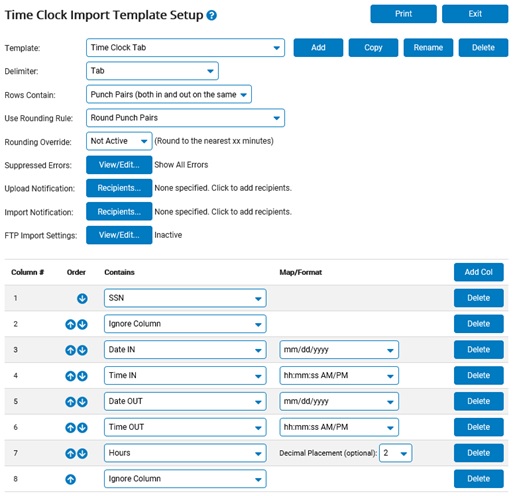
The template setup would look like this:
Time Clock Import TemplateTime Clock Import Template
Note: Certain fields are required to be in a file for the import to work. Each record must have some form of identification for the employee (social security number, ExponentHR ID, or employee number) and date/time information.
To set up a time clock import template:
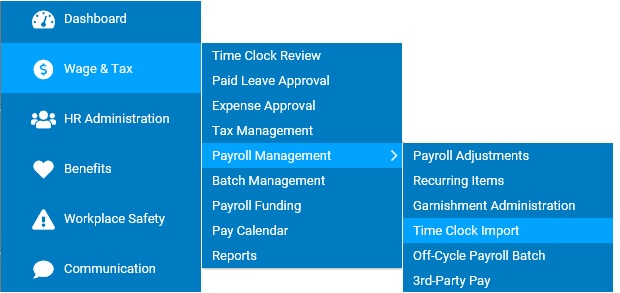
1. On the Management Navigation Menu, click Wage & Tax > Payroll Management > Time Clock ImportWage & Tax > Payroll Management > Time Clock Import.
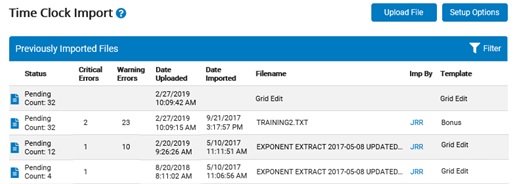
The Time Clock ImportTime Clock Import page displays, with a list of files that have been recently uploaded in the past 30 days.
2. Click the Setup Options button.
The Time Clock Import Template SetupTime Clock Import Template Setup page displays.
3. Click the Add button.
The Time Clock Import Template SetupTime Clock Import Template Setup page updates.

Note: To make a copy of an existing template, select the template from the Template drop-down box and then click the Copy button.
4. Type a name for the new template in the Template Name (Add) text box, and then click the OK button.
The Time Clock Import Template SetupTime Clock Import Template Setup page updates.
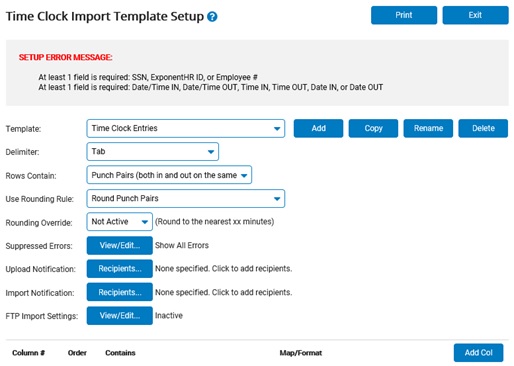
Note: You will receive a setup error message until you enter the required information (marked with a red asterisk).
5. Select the time reporting information that each row in the import file contains in the Rows Contain drop-down box.
|
Individual Punches (an in or out punch) |
Either a clock in or a clock out time punch per row |
|
Punch Pairs |
Both clock in and clock out time punches in the same row |
|
Hours Only |
Flat amount number of hours recorded in a time period |
|
Pieces Only |
Flat amount number of pieces completed in a time period |
|
Tips/Sales |
Flat amount of tips or sales receipts collected in a time period |
|
Miscellaneous Adjustments |
Flat amount number of one-time earning, deduction, or employer contribution adjustments, which can be used in conjunction with the override rate functionality |
6. If choosing to use one of the Punch or Hours-based templates, select whether you want to apply rounding rules in the Use Rounding Rule drop-down box.
|
Round Punch Pairs |
If you selected Punch Pairs or Individual Punches, rounds the clock in and clock out times based on company rounding rules |
|
Round Total Hours Only (converts to Hours Only Punch) |
Rounds the number of hours worked based on company rounding rules |
|
Do Not Round |
Does not round any clock in or clock out times |
Note: You cannot use rounding rules for piecework, tips, sales receipts, or miscellaneous adjustment templates.
7. If you chose to round the punches and want to override your company rounding interval for the imported time clock punches, select the number of minutes (between 1 and 60 minutes) to which you want to round each punch in the Rounding Override drop-down box.
Note: For example, if your company has a rounding rule of 15 minutes but you want the imported time clock punches rounded to the nearest 5-minute interval, select 5 minutes in the list. A punch-in time of 8:02 AM is rounded to 8:05 AM instead of 8:15 AM.
8. If you selected Individual Punches for Rows Contain, specify whether cost allocation information is based on the clock-in time or the clock-out time in the Cost Allocation drop-down box.
9. Activate the Preserve existing manager time clock approvals option if it is your preference to have the imported items added to the employee's time clock without removing the management approval of the employee's time (if present). When not selected, any existing approvals will be removed, requiring the time supervisor to review the amended employee time clock and re-approve.
10. Suppress any non-critical errorsnon-critical errors that you do not want to review before import.
|
Error |
Description |
|
Notes Exceed Max 200 Char Limit |
Notes exceed maximum size. Only the first 200 characters are imported. |
|
Multiple Open Punches |
Multiple punches without a corresponding IN or OUT punch, resulting in multiple incomplete punches. |
|
Overlapping Punch |
Punch overlaps the time/date of another punch. |
|
Missing Time IN |
Missing a corresponding Time IN, resulting in an incomplete punch. |
|
Missing Time OUT |
Missing a corresponding Time OUT, resulting in an incomplete punch. |
|
No Open Punch for Clockout |
Missing a corresponding Time IN individual punch. |
|
Hours are Greater Than 24 |
Hours in hours-only punch are greater than 24. |
|
Punch Crosses Over Day |
Time OUT was more than 20 hours after Time IN and occurred on a different day. |
|
Hours = 0 |
Time IN and Time OUT are identical. |
|
Pieces = 0 |
Zero pieces in individual row for specified employee. |
|
Field is Empty |
No data in data file for specified field in import template. |
|
Terminated Employee |
Employee is terminated, but will still be paid for the imported hours. |
|
Exempt Employee |
Employee is FLSA Exempt. Hours imported are used for cost allocation purposes only. |
|
On-Leave Employee |
Employee’s status is On-Leave, but employee will still be paid for the imported hours. |
|
Invalid Variable Rate Type |
Employee is not active for variable rate specified in data file. |
|
Code [pay code] is inactive |
Tip Amount - Code Specific column is mapped to an inactive tips code. |
|
Tip Amount >= $10,000 |
Tip Amount column contains a value greater than or equal to $10,000. |
|
Tip Amount < $0.00 |
Tip Amount column contains a negative value. |
|
Charge Receipts column is blank. Entire Total Receipts amount imported as Cash Receipts. |
Total receipts are greater than zero, but Charge Receipts column is blank. |
|
Gross Receipts are less than zero |
Charge Receipts plus Cash Receipts are less than zero, or Total Charge Receipts are less than zero. |
Suppress errorsSuppress errors
1. Click the View/Edit button next to Suppressed Errors.
The Display/Suppress Non-Critical ErrorsDisplay/Suppress Non-Critical Errors page displays.
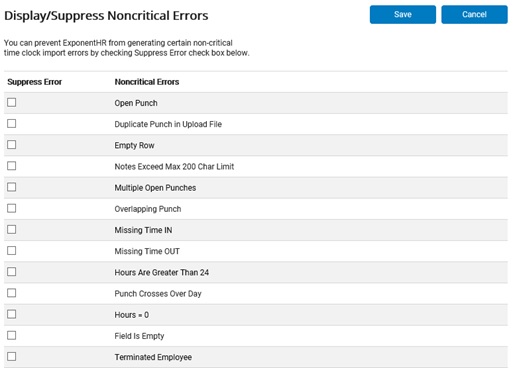
2. Select the check box next to each non-critical error you want to suppress.
3. Click the Save button.
11. Assign who will be notified when time clock reporting information is uploaded or imported.
Set up upload notificationSet up upload notification
1. Click the Recipients button next to Upload Notification.
The Recipients: Upload NotificationRecipients: Upload Notification page displays a list of employees at your company.
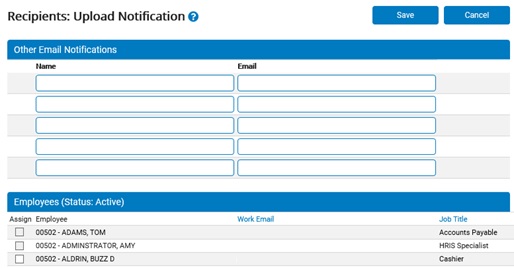
Note: Terminated employees and employees on leave are included at the bottom of this list.
2. Select the check box next to each employee who you would like notified by e-mail when the event occurs.
3. If you want to send notifications to an employee's alternate e-mail address (other than the address included in ExponentHR), enter the employee's name and e-mail address in the Other Email Notifications text boxes.
4. Click the Save button.
Result: Every time a time clock upload occurs, ExponentHR will send all employees you specified a notification email.
Set up import notificationSet up import notification
1. Click the Recipients button next to Import Notification.
The Recipients: Import NotificationRecipients: Import Notification page displays a list of employees at your company.
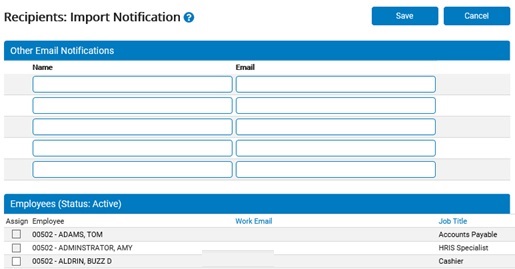
Note: Terminated employees and employees on leave are included at the bottom of this list.
2. Select the check box next to each employee who you would like notified by e-mail when the event occurs.
3. If you want to send notifications to an employee's alternate e-mail address (other than the address included in ExponentHR), enter the employee's name, title, and e-mail address in the Other Email Notifications text boxes.
4. Click the Save button.
Result: Every time a time clock import occurs, ExponentHR will send all employees you specified a notification email.
12. Set up the template based on the type of file from which you are importing.
Set up for a tab-delimited text fileSet up for a tab-delimited text file
1. Select Tab in the Delimiter drop-down box.
2. Click the Add Column button for each column in the import file.
Note: You will receive a Setup Error Message until you set up all of the required columns.
3. Next to each column number, select the type of data that the column contains from the drop-down box.
Notes:
Set up for a CSV fileSet up for a CSV file
1. Select CSV (Comma w/ quotation marks) in the Delimiter drop-down box.
2. Click the Add Column button for each column in the import file.
Note: You will receive a Setup Error Message until you set up all of the required columns.
3. Next to each column number, select the type of data that the column contains from the drop-down box.
Notes:
Set up for a fixed width-delimited text fileSet up for a fixed width-delimited text file
1. Select Fixed Width in the Delimiter drop-down box.
2. Click the Add Column button for each column in the import file.
Note: You will receive a Setup Error Message until you set up all of the required columns.
3. Next to each column number, select the type of data that the column contains from the drop-down box.
Notes:
4. Next to each column number, type the number of character spaces in that column in the Width text box.
Set up for an other character-delimited fileSet up for an other character-delimited file
1. Select Other Character in the Delimiter drop-down box.
2. Type the character used to separate the columns in the import file (such as * or |) in the Character text box.
Note: The import process does not support common delimiter characters that may ordinarily appear in a phone number or name, such as a dash (-) or forward slash (/).
3. Click the Add Column button for each column in the import file.
Note: You will receive a Setup Error Message until you set up all of the required columns.
4. Next to each column number, select the type of data that the column contains from the drop-down box.
Note:
13. If the column has associated codes that differ from what has been set up in Code Management, you must map the codes.
1. Click the Map Values button.
The Map Column ValuesMap Column Values page displays.

2. For each ExponentHR code, type the matching code from the import file. (For example, for the ExponentHR Location Code Dallas, your source file might have it as DFW.)
3. When you are finished, click the Save & Exit button.
Note: For individual punches, you must include a punch type column and then map the values for clock in, clock out, and possibly transfer (single row that functions as a clock out then a clock in simultaneously).
14. For any date or time, select the format in the drop-down box next to it.
Note: For punch-pair rows, you can map a single date column, or a Date IN and Date OUT column.
15. Click the Exit button.
Result: The Time Clock Import template is saved. You can now use it to import time clock punches from the source file (including any number of pieces reported). See Related Help Topics below for more information.
Related Help Topics:
Uploading a Time Clock Import File