Managers have visibility into employees' open enrollment benefit elections. Using the Open Enrollment Status tool, managers can see which employees have submitted their enrollments and what coverage they elected. In addition, managers can make edits for employees, send Open Enrollment notifications, and re-open Open Enrollment to submit elections for employees.
To administer open enrollments:
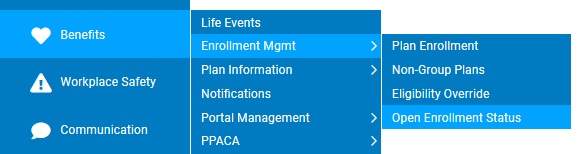
1. On the Management Navigation Menu, click Benefits > Enrollment Mgmt > Open Enrollment StatusBenefits > Enrollment Mgmt > Open Enrollment Status.
The Open Enrollment StatusOpen Enrollment Status page displays.
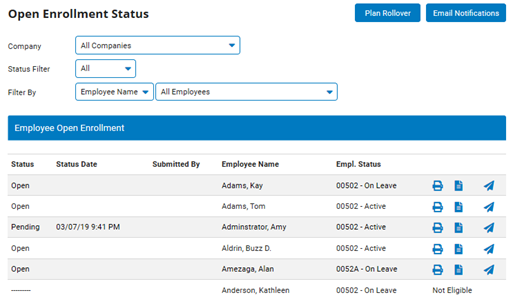
2. To filter the employee list by status, select the filter (Open, Pending, Submitted, or Not Eligible) in the Status Filter drop-down box.
3. To filter the employee list by employee name, pay group, pay method, or any classification, select the filter and any sub-filter in the Filter By drop-down list, and then click the Apply Filter button.
The employee list shows only those employees who match the filter selections.
4. View the Employee Open Enrollment table to see the enrollment status of employees at your company.
Viewing the Status of Each Employee's Open EnrollmentsViewing the Status of Each Employee's Open Enrollments
During
Open Enrollment, you have the ability to view the status of
each employee that is eligible for open enrollment. You may
see which employees have submitted their open enrollment changes,
as well as view the progress other employees have made. |
1. Use the scroll bars on your browser to view the list of employees.
Note: The current statusstatus of each eligible employee's enrollment is listed next to the respective employee name.
Open status indicates that the employee has not yet begun the enrollment process.
Pending status indicates that the employee has viewed or edited his/her Open Enrollment elections.
Submitted status means the employee has successfully completed benefits enrollment.
Viewing Employee Open Enrollment ConfirmationsViewing Employee Open Enrollment Confirmations
In
reviewing the Open Enrollment Status report, you want to see
what an employee has elected as coverage for their plans.
By viewing the "Report" for each employee in question,
you may review the same confirmation report that the employee
received during their submission of open enrollment. |
1. To view the
details of any employee's enrollment, click the Report
icon (![]() ) in the employee's row of the
Employee Open Enrollment table.
) in the employee's row of the
Employee Open Enrollment table.
Result: The [Next Plan Year] Benefits Enrollment Confirmation page for the employee displays, showing all the employee's current benefits enrollments. You may print this page, if necessary.
Editing Employee Open EnrollmentEditing Employee Open Enrollment
One
of your employees calls you and has a question about what
they have submitted during Open Enrollment. After reviewing
the information on the Open Enrollment Status report with
the employee, they would like to change their FSA election
to a lesser amount. You may update the election for this area,
rather than the employee having to re-open their elections
and make the change for themselves. |
1. Click the Re-Open button in the employee's row of the Employee Open Enrollment table, then click the OK button.
2. To edit any
employee's benefits enrollment, click the Details
icon (![]() ) in the employee's row of the
Employee Open Enrollment table.
) in the employee's row of the
Employee Open Enrollment table.
The Open EnrollmentOpen Enrollment page for the employee displays.
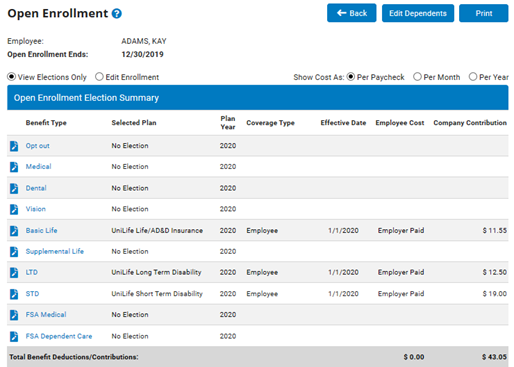
3. Select the Edit Enrollment radio button.
4. Change the employee's benefits enrollments, as necessary (see Related Help Topics for more information).
5. Click the BackBack button.
![]()
Result: The Employee Open Enrollment page displays. Your changes to the employee's benefits enrollment are saved, with a status of Pending. Click the Submit button to submit the changes.
Submitting Employee Open EnrollmentSubmitting Employee Open Enrollment
The
end of the time frame for Open Enrollment has been reached
and there are several employees who have not yet completed
the open enrollment through ExponentHR. You may submit elections
for each employee according to the company policies during
Open Enrollment. |
1. Click the Submit button in the employee's row in the Employee Open Enrollment table.
The [Next Plan Year] Benefits Enrollment Confirmation page displays.
2. Click the Approve button.
Result: The Employee Open Enrollment page displays, and the employee's benefits enrollment status changes to Submitted.
Note: After you submit the employee's benefits enrollments, the Submit button will be replaced with a Re-Open button.
Sending Open Enrollment NotificationsSending Open Enrollment Notifications
Managers may send notifications to the work e-mail addresses of groups of employees eligible for the open enrollment process, if necessary. The system will automatically include your email name/address in the 'Sender' field within the email.
Though
you are nearing the end of your Open Enrollment process, over
50% of your employee base has still not completed open enrollment
though ExponentHR. To ensure that all employees complete their
enrollment prior to the deadline, you may create a notification
addressed to employees who have an open or pending status
only. These employees
will receive a notification reminding them of the deadline
for Open Enrollment. |
Note: Employees with missing or invalid email addresses in their ExponentHR account will not be included in the notification.
1. To send benefits notifications to any employee, click the Email NotificationsEmail Notifications button.
The Open Enrollment NotificationsOpen Enrollment Notifications page for the employee displays.
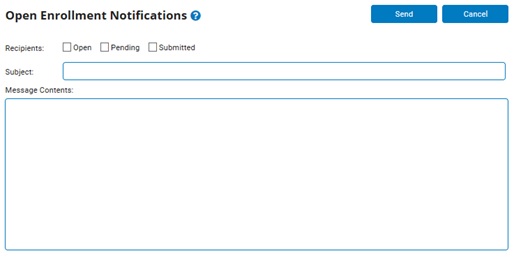
2. Check the RecipientsRecipients check boxes to specify the group(s) of employees to which you want to send the notification.

Notes:
You may send the notification to all employees in a specific benefit statusstatus by checking the appropriate check boxes.
Open status indicates that the employee has not yet begun the enrollment process.
Pending status indicates that the employee has viewed or edited his/her Open Enrollment elections, but has not completed enrollment.
Submitted status means the employee has successfully completed benefits enrollment.
If you used filters in the employee list on the Open Enrollment Status page, the notification gets sent only to those employees in the filtered list.
3. Enter the subject of the notification in the Subject text box.
4. Enter the text of the notification in the Message Contents text box.
The text you enter will appear in the body of the e-mail the group(s) of employees you selected receive.
Note: Typing <link> anywhere in the Message Contents text box will display a hyperlink to open the Open Enrollment Page from the e-mail.
5. Click the SendSend button.

Result: All employees in the group(s) you selected receive the notification e-mail you just created.
Related Help Topics:
Enrolling a New Employee in Benefits